This is Jennifer's break before her last quarter of nursing school. She wanted to go on a mini-vacation before putting her nose to the grindstone again.
We decided to hit some sites in Eastern Washington where the weather should be drier this time of year. I also got the idea from my previous climbing trips to Frenchman's Coulee that it would be nice to cover some ground by mountain biking on the jeep roads through the desert. So we loaded up the bikes and set course east.
On the way over, we decided to drive far the first day to Palouse Falls State Park. This would mean we could hit sites on the way back, and have a shorter drive on our final day. So we passed the coulees of Central Washington, and drove through the flat farmland to reach our destination in the southeast portion of the state. After making a few scenic stops and to check out camping accommodations we arrived at Palouse Falls State Park in the afternoon. Guidebooks herald the falls as one of the best in the state. This is true. But part of the beauty of the falls is that the Palouse river flows through the deep basalt cliffs of Palouse Canyon below the falls. Not quite The Grand Canyon, but quite a wonderful site to see. We strolled around the grounds and viewed the falls and upper falls. There are a few scrambles that would take you closer to the falls, but we opted not to. The "Falling can be deadly" signs must have worked on us.
Since camping was available in the park, we set up the tent and stayed the night.
Palouse Falls pics here.
The next day we awoke to rain. So we decided to head south to Walla Walla and check out some wineries. On the way there, we hoped to stop in Lyon's Ferry State Park, but it was closed for the season. We were able to get in via access through some federal land and got to glimpse the lower Palouse Canyon and the confluence of the Palouse and Snake rivers at Lyon's Ferry. Lyon's Ferry State Park also marks the location where the oldest human remains have been found in North America. The dig site is now buried under water, but it is still an interesting place. We walked a bit around, then headed toward Walla Walla.

Sulfur Lake and the confluence of the Palouse and Snake Rivers
We stopped in two wineries in Walla Walla; the Three Rivers and L'Ecole #41. Both were nice and the old school house that is L'Ecole #41 was really quaint. It appears most wineries in Walla Walla charge for a tasting. (Usually $5 per person, but we were able to split the charge.)
After Walla Walla the weather cleared a bit, and we were headed to Potholes State Park to camp for the night. On the way there, we were going to stop at Twin Sisters Rock a little south of the Walla Walla River on the Columbia. In the guide book, it looks more impressive in size than it actually is. It is a cool formation, but with such easy access to the road, it is heavily vandalized. After a short hike up, we headed north to Potholes.

Twin Sisters Rock
We arrived in Potholes State Park and much to our enjoyment read that the camping fee was free until April 1st. We set up camp and hiked around a bit. Potholes State Park is centered around Potholes Reservoir which is a man made reservoir out in the desert. The damming of the stream, caused the water table to rise, and filled many of the potholes in the area with water. Unlike the rest of the desert, there tends to be lots of water, and it is a bit greener too. A little to the east of Potholes State Park is the Columbia National Wildlife Refuge, which hosts many migrating birds. We hiked along the creek in Potholes and saw lots of deer tracks and coyote scat, but no mammals other than a muskrat.
We set our sites for the final day to ride the roads in the Wildlife Refuge through the desert. We went to sleep under clear but windy skies. The next morning we waited a bit for the sun to warm the desert before heading out. It is about a two mile road ride from the state park to earliest entrance to the refuge. You could ride along the narrow dam roadway if you wanted to enter the refuge farther east. We wanted to start our adventure as soon as possible and entered the refuge right before the dam.
Although it was clear the refuge had seen a fire some time in the past, the area is significantly more lush than the surrounding desert due to the higher water table. There is more variety of vegetation than the typical sagebrush and rye grass. We rode on jeep trails for a bit, until we noticed the sky darkening and rain starting to our east. We hoped to ride back to the west and out to avoid it, but wound up at a dead end. As we headed back to retrace our route, we went through a bit of a dust storm, and eventually the rain which was headed in the opposite direction of us. It was over before we got really wet, and we retraced our route back out to a location we could ride out from. Jennifer was a little tired, and we left to go home.
Overall, I'd like to do some more exploring in the desert on my mountain bike. It was a fun and faster way to get around than on foot. Although I did find it somewhat difficult in the more sandy sections. Hopefully I'll have more opportunity in the future to do it again.
Wildlife refuge pics here.


 The most typical use of twine on a bicycle, is to secure the inner edges of handlebar tape. Normally, bar tape is secured with black electrical tape and left as is, but I find that this looks unfinished. With twine, the handlebars will look more appealing and the tape will be more securely attached.
 After wrapping your bar tape and securing the inner edges with electrical tape, the twining can begin.
 If you've finished twining your bars and still crave more, do not despair: There are lots of other places on a bicycle where twine can be used. I twined the chrome connector piece between the rack and the rear stays on my Pashley, because I was not satisfied with how the expanse of chrome stood out in an otherwise green and black colour-scheme. The dark amber twine softened that area up, and integrated it nicely with the wicker basket, brown leather saddle, and handlebar grips.
 Here is a close-up of the twined rack connector. I thought that this was a failry subtle detail, but to my surprise, several people commented on it while examining my bicycle.
 My most daring use of twine thus far, has been the twining of my Shimano Nexus shifter. My reasons for doing this were two-fold: I thought that the big rubber shifter was too modern for the aesthetic of the Pashley's handlebars, and I also found it unpleasant to the touch, especially in the sumemr heat. Covered with shellacked twine, the shifter blends in better and is more comfortable for me to use, as the twine provides a better grip than the rubber. There was some concern regarding whether the twine would adhere well to the rubber, but this was not an issue; just wrap it tightly prior to shellacking.
 Of course, once you do this to your shifter, there is no going back: the shellac will disfigure the rubber if you ever decide to remove the twine and you will need to buy a new one. Twine at your own risk!
 Half an hour after leaving the campground, I was ecstatic when I rounded a curve and there was Mt. Rainier! Rather gray in the early morning gloom, but there it was!
 In the next 15 minutes, the mountain could be seen in several places and each vista presented a slightly different view. The road then went on the side away from Rainier and I could see that the sun would soon break through the clouds. The road twisted and turned and the going was agonizingly slow but after another 20 minutes I was at Sunrise Point.
 From there on the views were absolutely stunning, especially whenever the sun decided to make an appearance.
 A few minutes later, I was at the nearly empty parking lot of the Sunrise visitor center, which was closed for the season as was the Ranger Station. I strolled along one of the numerous trails, intending to walk for half an hour or so. But it was such a beautiful day and the mountain was mesmerizing. My short walk ended up being more than three hours long.
 Looking north from the Sourdough Ridge Trail. (Double-click on this one to open the larger image - it's worth the extra clicks...)
 Another view, looking north, from the Sourdough Ridge Trail.
 The valley between Sourdough Ridge and Mt Rainier. The road is a gravel service road. There were workers out doing maintenance on some of the trails.
 I walked to the other side of Burroughs Mountain (the ridge running in front of Mt Rainier). There was a trail that went up there with a view of Frozen Lake. I started up it but turned around after realizing it would take more time and energy than I could muster.
 At times, the mountain seemed so close. Like I could reach out and touch it.
 Why doesn't that snow fall? What is holding it up there? How deep is it?
 To return to the parking lot, I took another trail, which went down into the valley. There weren't as many views of the mountain but the stillness and peacefulness were almost overwhelming.
 Upon reaching the parking lot I decided to go down one more trail. A short one, less than half a mile round-trip, to Emmons Vista. Probably one of the most-photographed views of Rainier, just because it is so close to the visitors center.
 Less than an hour later, you guessed it, the gray clouds had moved back in and the sun had taken its leave. And so did I.
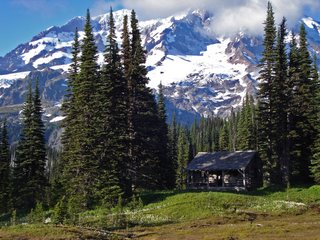 The snowpack is rapidly melting, which allows for quick and easy access to the alpine. Most of the Wonderland Trail, for instance, has melted out (save Panhandle Gap area.) The meadows are in full bloom, yet the upper mountain still has a fair amount of winter snowpack. Time to climb...