First you pick the fruit. Then you wash the fruit, cut it open and in the case of apples you can get the juice in several ways. One way it to simply cut the apples in at least quarter pieces, the smaller the better and cook them. Or if you want you can core the apples and cut into small pieces and cook them. You can peel them but you are loosing a lot of juice doing that as it does when you core them. Once the apples have cooked for an hour or so they will be very soft and mushy. Let the fruit cool until it can be handled. The most efficient way I found was to put several pieces of cheesecloth layered together in the ricer, or sieve and use a large metal spoon to smash the fruit causing the juice to leak through the cloth and sieve and into a large container under the sieve. When the fruit was all smashed I would pull the cloth out of the sieve, remove the sieve from the container and holding the top of the cloth closed with one hand I would squash the apple pulp in the cloth to get the rest of the juice out. Refrigerate until ready to make the jelly.
For the peaches I would wash them, cut them open removing the pit and cook the fruit following the same procedureas for the apples.This works for almost all fruit.
Now to the jelly. Heat the juice until warm. At the same time heat a large (and I mean large) pan of water with a lid for sterilizing thejelly jars. You can buy largecanning pots with a lid andmetal basket in it that work well. Mine is about five gallon pot. The jars I use for jellyare half pint jars. I use pint jars for canning applesauce, and apple slices, and peach slices. Wash the jars, their screw onrings and the sealinglids that have a rubber seal around the edge that come with them.When you first buy jars they will have all three parts but jars andscrew on rings can be used over and over. Never use an already used sealing ring. It won't work properly.You just have to buy new sealing lids each time you seal a jar.
When the waterin the large pot is boilinggentlydropjust the jars in the water to sterilize them. While that is happening add a packet ifSureJell to the juice and bringto a full rolling boil that can't be stirred down. Add the sugar. (SureJell has information on how to do this in all packets of Sure Jell and each kind of fruitneeds a different amout of juice per sugar amount.) Again bring to a boil and stir one minute at full rolling boil that can't be stirred down.You can skim the small amount of foam off the top if you want.
You should now have very hot jelly.
I did the first batch of apple jelly and it came out perfectly.
Oh, but the second batch didn't. It wasn't boiling and it wasn't boiling and I turned my back on it for about 15 seconds and it came to a boil and went all over the stove top, down the side of the stove both outside the door and inside the oven door. And all over the floor and under the stove.
What a mess!
I was able to rescue 7 jars of jellyof the 9 I had figured for. And it jelled and was fine. By the time hubby came in I had cleaned up most of the jelly on the stove top and down the door. But he had to help me pull out the stove and clean the floor under it.
OK I thought. Something always has to go wrong with cooking. this should be all of it.
I froze 8 quarts of peaches in the freezer and canned 6 pints of applesauce as well as having about 3 pints I kept for eating right away.
Next was some peach jelly. Horrors! It didn't jell!
I tried the information for redoing the jelly on the SureJell packet when it doesn't jell and it still didn't jell. I called them. They told me they didn't have any information except what was on the packet. (So why are there people you can call for help?)
I opened all the sealed jars, dumped them in the pot for cooking the jelly, started over but didn't add any sugar. but did add another packet of SureJell. It worked. Peach jelly jelled.
Now I have done a batch of jelly of half peach and half apple juice mixed together. I is good jelly.


Hubby has been pealing apples for more applesauce so I guess I know what I'll be doing tomorrow.


 Thinking about the best way to give away the refurbished vintage touring bike "for women who fear roadbikes," I kept coming back to the connection between cycling and the Ride Report. If you've spent any time browsing blogs and websites about bicycles, you are no doubt familiar with the genre. While at its most basic level, a ride report is simply a description of a bicycle ride, it is really so much more. Some are infused with a seriousness and depth of analysis that is normally reserved for historical descriptions of war battles. Others are light-hearted and hilarious. Others still are impressively dull, filled with endless lists and technical descriptions. A Ride Report can resemble a travelogue, a parable, a newspaper article, or an entry in a physical fitness diary. A Ride Report can be self-aggrandising or self-depricating. A Ride Report can describe a 1,000 mile tour or a 1 mile trip to the grocery store with equal degrees of drama and suspense. At the heart of it, a Ride Report tells us less about the ride itself than about the cyclist - and the cyclist's relationship to their surroundings, their bicycle, and the very experience of riding a bike.
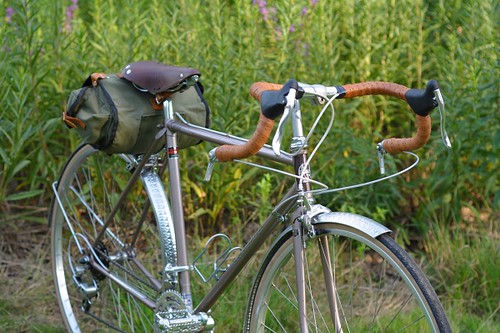 Give-Away Details
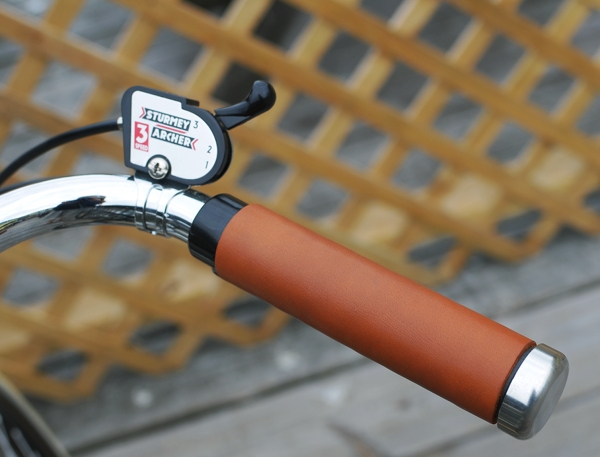 On bicycles with internally geared hubs, we typically see two types of gear shifters. The trigger shifter (pictured above) is a small gadget with a lever that is moved up and down. Today, this style of shifter usually accompanies Sturmey Archer hubs (though in Europe I have seen some lesser known models as well).
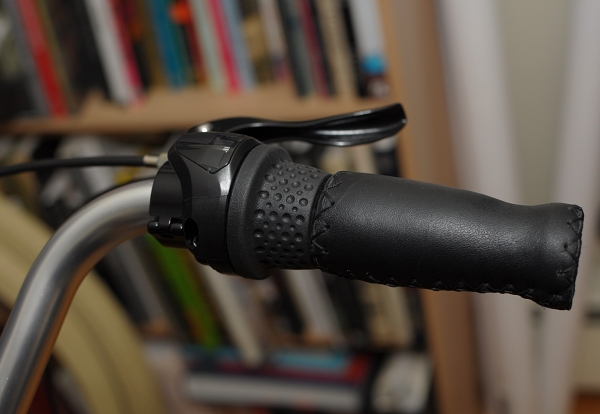 The twist shifter (pictured above) is a plastic and rubber enclosure that is built into the handlebar grip itself. To switch gears, you grab the rubber part and twist forward or backward. This style of shifter usually accompaniesShimanohubs.
 After using both types of shifters on various bicycles I've owned to more or less the same extent, I have developed a strong preference for trigger shifters. When I tell people this, they tend to assume it has to do with "vintage aesthetics" - but actually, it has to do with comfort. A trigger shifter takes up very little space on the handlebars, as it is attached with a narrow bracket. This means that the shifter does not interfere with the gripping area, and allows me to install full-length grips on the handlebars.
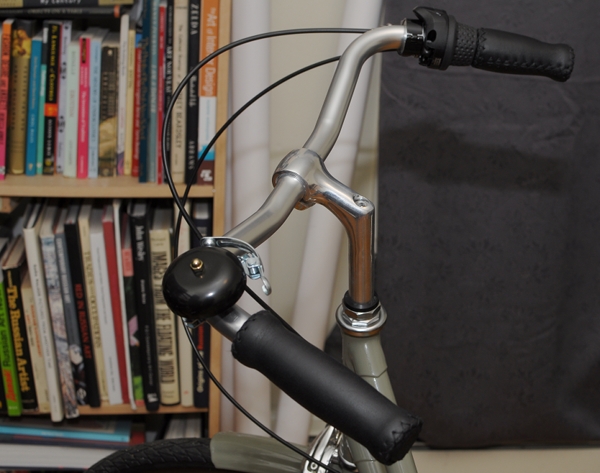 By contrast, having a twist shifter installed effectively cuts your gripping area in half. Notice that the right handlebar grip on the Bella Ciao above is shorter than the left grip - necessary in order to make room for the shifter. Granted, you can also keep your right hand on the rubber portion of the shifter itself - but it's not very comfortable, especially as there is a tactile break between where the real grip ends and the shifter begins.
 But why is it important how long your grips are, as long as you are able to fit your hands on them? The reason, is that having room to move your hands around on the handlebars, even a little, can be essential for hand comfort - especially on long rides. If you ride your bicycle for just a couple of miles or so at a time, then you might not get the urge to move your hands around. But the longer your ride is, the more fatigued your hands will get if you keep them in the same position. Some people are more sensitive to this than others, and those who have nerve damage in their hands (like yours truly) are particularly prone to it. The feeling can range from numbness, to "pins and needles" to a more severe sensation of electric current running through the hand. It is not good to experience this problem, and having room on the handlebars to move your hands around allows you to avoid it. Long gripscan also help you switch between a more relaxed and a more aggressive position on your bike (by holding the grips further forward or further backward) - giving you some added control over speed.
 Getting back to shifter styles, here is my right hand on the shortened grip that is integrated with the twist shifter on my Bella Ciao. As you can see, my hand covers the entire grip, with no room to move around - unless I place it on the shifter itself, though even then it is limited. And I had the same problem with this shifter on my previously-owned Pashley, which came with the 7-speed Shimano hub I innocently selected.
 On the other hand, here is my hand on the grip I installed on my Gazelle. As you can see, there is room for another handful - which is only possible because of the trigger shifter.
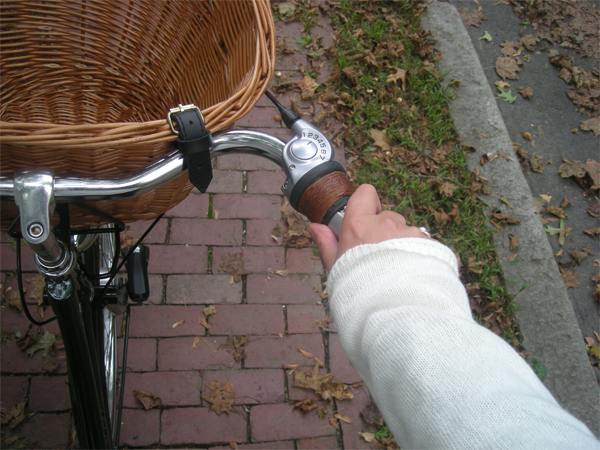 I will note that one benefit of the twist shifter, is that it is more integrated with your hand position - which can be a plus if you switch gears very frequently. But on bicycles with internally geared hubs - especially 3-speeds - I have found that I tend to stay in one "ideal" gear most of the time, switching to a lower gear only when going uphill, and switching to a higher gear only when cycling very fast or downhill. Having to reach with my finger to pull the trigger has not caused me any inconvenience in comparison to using the twist shifter. Your experience, of course, may differ.


