 This is out on the desert near where I sometimes ride. On this day I walking my Border Collie Tuffee. You can see the Sandia Mountains in the distance. Albuquerque is hiden between us and the mountains down along the Rio Grande valley.
Tuesday, September 27, 2011
The Desert
This is out on the desert near where I sometimes ride. On this day I walking my Border Collie Tuffee. You can see the Sandia Mountains in the distance. Albuquerque is hiden between us and the mountains down along the Rio Grande valley.Sunday, September 25, 2011
More on leashless gloves
My Outdoor Research, Verts, after 50+ pitches of water ice and dbl rope rappels. Seams, material and leather palms still intact and still good to go after some literally smoking raps on thin, twin ropes.

I keep being reminded how a really lwt, breathable and not water proof glove like the OR Vert performed this winter on Canadian ice. The longer climb I did where the gloves where soaked through and my boots filled with water while rapping down comes to mind. I was able to literally wring the gloves out twice on route and put them back on. As the sun went down I was prepared for the worse and ready to pull a dry pair of gloves out of the pack when I got a chance but half way down the decent I noticed the Vert gloves were warm and dry again. "Amazed", isn't too strong of word.
So may be being water proof isn't such a big deal in radically changing conditions and may be getting the gloves dried out while still in the field is even more important. For those that can remember back that far the wool Dachsteins come to mind as a mitt that never failed, no matter what the conditions were. They did breath and they were not water proof. They are a hard act to follow actually when I think back on it. Every water proof glove to date I've used just gets wet from my perspiration and have been very difficult to dry out. More food for thought for glove choices.
I have also found out recently that both OR and Mtn Hardware offer "lifetime" guarantees on their gloves. A guarantee I tested this week with Mtn Hardware. Money well spent on any of these gloves imo.
Here are two more models that I am now using and easily fit into my glove selection and my criteria from the previous post on leashless gloves.
"My list of features for a good glove?
Leather palms and fingers, Shoeller material in the glove body, nose wipe, medium to long, well tailored, wrist cuff. Both finger and cuff hangers and preferably a low profile velcro seal on the cuff and wrist. Or at least a better elastic draw cord arrangement than what is common in most everyone's design. Easy to turn inside out to dry....or at least easy to dry. Thin removable liners might even be better if you could minimise the bulk. And most importantly FLAT SEAMS on the bottom of the little finger and hopefully those seams on the side, not the bottom of the finger. Seams there, when climbing leashless, will make your life miserable in the extreme."
Either could easily become a favorite with the other three climbing gloves I am using. Mtn H's Torsion is certainly a best buy money wise if you buy into the non water proof glove idea.

They also fit my personal want list very closely, hitting every point except drying easily. But easy enough.
Mtn Hardware Torsion retails for $60. Little more insulation/bulk than the OR Vert and a much better cuff. More insulation means they are a little harder to dry out. A very nice glove.
Mtn H's spiel:
"Torsion Glove
A snug soft shell glove for alpine climbing. Articulated cut for excellent dexterity, with flatlock seams for a comfortable fit. Durable, water-resistant goatskin palm and fingers stand up to rock or ice.
Alpine Climbing / Mountaineering
Weight 3 oz. / 98 g.
Lining Brushed Tricot
Body Deflection™ Soft Shell
Palm Material Water-resistant Goatskin Leather
"
These are the OR Storm Tracker glove. $69 retail. Thin glove and maybe better dexterity than the Vert. Nice cuff length even with the added hassle of the zipper. A little steep price wise compared to the other lwts but these guys rock as a technical climbing glove. Durability my be a question so we'll see if that O.R. "INFINITE..guaranteed FOREVER works" :)
OR's spiel:
•Intended Usage: Versatile backcountry work glove for ultimate dexterity
Breathable/water-resistant WindStopper Soft Shell fabric; tricot lined
•Full leather palm
•MotionWrap AT construction for added dexterity
•Elasticized wrist chili
•Gusseted entry with locking zipper


I keep being reminded how a really lwt, breathable and not water proof glove like the OR Vert performed this winter on Canadian ice. The longer climb I did where the gloves where soaked through and my boots filled with water while rapping down comes to mind. I was able to literally wring the gloves out twice on route and put them back on. As the sun went down I was prepared for the worse and ready to pull a dry pair of gloves out of the pack when I got a chance but half way down the decent I noticed the Vert gloves were warm and dry again. "Amazed", isn't too strong of word.
So may be being water proof isn't such a big deal in radically changing conditions and may be getting the gloves dried out while still in the field is even more important. For those that can remember back that far the wool Dachsteins come to mind as a mitt that never failed, no matter what the conditions were. They did breath and they were not water proof. They are a hard act to follow actually when I think back on it. Every water proof glove to date I've used just gets wet from my perspiration and have been very difficult to dry out. More food for thought for glove choices.
I have also found out recently that both OR and Mtn Hardware offer "lifetime" guarantees on their gloves. A guarantee I tested this week with Mtn Hardware. Money well spent on any of these gloves imo.
Here are two more models that I am now using and easily fit into my glove selection and my criteria from the previous post on leashless gloves.
"My list of features for a good glove?
Leather palms and fingers, Shoeller material in the glove body, nose wipe, medium to long, well tailored, wrist cuff. Both finger and cuff hangers and preferably a low profile velcro seal on the cuff and wrist. Or at least a better elastic draw cord arrangement than what is common in most everyone's design. Easy to turn inside out to dry....or at least easy to dry. Thin removable liners might even be better if you could minimise the bulk. And most importantly FLAT SEAMS on the bottom of the little finger and hopefully those seams on the side, not the bottom of the finger. Seams there, when climbing leashless, will make your life miserable in the extreme."
Either could easily become a favorite with the other three climbing gloves I am using. Mtn H's Torsion is certainly a best buy money wise if you buy into the non water proof glove idea.
They also fit my personal want list very closely, hitting every point except drying easily. But easy enough.
Mtn Hardware Torsion retails for $60. Little more insulation/bulk than the OR Vert and a much better cuff. More insulation means they are a little harder to dry out. A very nice glove.
Mtn H's spiel:
"Torsion Glove
A snug soft shell glove for alpine climbing. Articulated cut for excellent dexterity, with flatlock seams for a comfortable fit. Durable, water-resistant goatskin palm and fingers stand up to rock or ice.
Alpine Climbing / Mountaineering
Weight 3 oz. / 98 g.
Lining Brushed Tricot
Body Deflection™ Soft Shell
Palm Material Water-resistant Goatskin Leather
"
These are the OR Storm Tracker glove. $69 retail. Thin glove and maybe better dexterity than the Vert. Nice cuff length even with the added hassle of the zipper. A little steep price wise compared to the other lwts but these guys rock as a technical climbing glove. Durability my be a question so we'll see if that O.R. "INFINITE..guaranteed FOREVER works" :)
OR's spiel:
•Intended Usage: Versatile backcountry work glove for ultimate dexterity
Breathable/water-resistant WindStopper Soft Shell fabric; tricot lined
•Full leather palm
•MotionWrap AT construction for added dexterity
•Elasticized wrist chili
•Gusseted entry with locking zipper
Experts in Skincare
I saw this life-size display in a Marionnaud storefront a couple of days ago. It is a German-language Clarins advert and the text reads: "your experts in skincare".
 You can't quite see this here, but the model's underpants are semi-transparent. And the poster is sized and positioned in such a way, so that the viewer's gaze is directed at the space above the bicycle saddle. Right.
In terms of the psychology of advertising, I think this poster is very Austrian: freikörperkultur, health as the path to sexiness, sun worship, golden hair, long legs, lean muscles, and a symbol of an active lifestyle - in this case a sporty bicycle. Whoever came up with the ad was clearly trying to evoke stereotypical cultural ideals. I don't suppose too many people notice that the saddle is set too low...
You can't quite see this here, but the model's underpants are semi-transparent. And the poster is sized and positioned in such a way, so that the viewer's gaze is directed at the space above the bicycle saddle. Right.In terms of the psychology of advertising, I think this poster is very Austrian: freikörperkultur, health as the path to sexiness, sun worship, golden hair, long legs, lean muscles, and a symbol of an active lifestyle - in this case a sporty bicycle. Whoever came up with the ad was clearly trying to evoke stereotypical cultural ideals. I don't suppose too many people notice that the saddle is set too low...
Wednesday, September 21, 2011
More Glove Love: Convertible Mittens
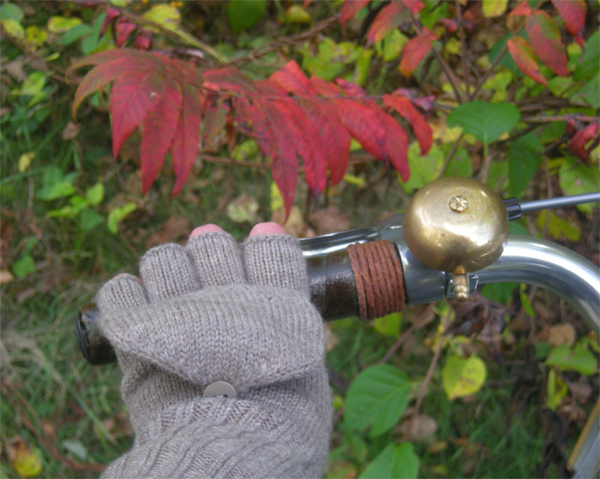 With the arrival of colder temperatures, my crochet cycling gloves were no longer cutting it. The Co-Habitant came to the rescue with a welcome gift: convertible mittens in a luxuriously soft wool. I love these things!
 The convertible mittens are basically fingerless gloves, with extra "mitten flaps" above the knuckles. The flaps can be unbuttoned and folded over the fingers to create mittens. The thumb is full-fingered. The Co-Habitant bought these at the Banana Republic outlet store. They were available in this heathery beige colour, and also in black. Apparently many mainstream apparel manufacturers now sell versions of these.
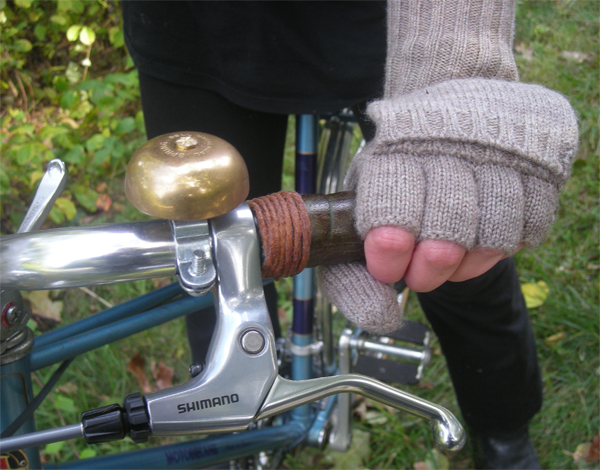 Aside from being clever and cute, these convertible mittens have several features that make them particularly suitable for cycling. Having the tips of the fingers exposed allows for optimal shifting, braking, and other machinations (such as camera clicks) that do not work so well when the finger tips are covered. The mitten mode makes them versatile as on/off the bike gloves. The 100% wool is great for warmth and moisture-wicking, and is not slippery on the handlebar grips.
 An additional benefit, is that these gloves are extra long, which is excellent for protecting cyclists' wrists when they get exposed to the cold air due to the stretching of the arms to reach the handlebars. All those jackets, coats and sweaters with sleeves not long enough for cycling can be supplemented with long gloves like these.
 Convertible mittens in action. For those of you who knit, this might make a fun and worthwhile project (see instructions in pdf). Just make sure to use a soft 100% wool yarn (or wool and silk blend) and not an acrylic blend, and to make them extra long.
Tuesday, September 20, 2011
Umbilicals again?

Michael: Petzl Quarks with my homemade tethers. Soloing the only hard winter route on Mt. Washington. Note the 4mm cord attached to the spike. I found that the tethers clipped directly to the tool took away from the feel of the swing. The sound interfered with my concentration, also.
all photos courtesy of Micheal Wejchert's collection
This is a guest blog from east coast climber, Michael Wejchert. Hopefully it won't be his last.
More of Michael's writing and adventures can be found here:
http://www.farnorthclimbing.blogspot.com/

Me soloing the Last Gentleman with BD's, Sketchy?
Umbilicals
By Michael Wejchert
"Alpinist 8 had the north face of north twin issue, which came out my sophomore year at college. I think this was the first time I saw anyone going leashless alpine climbing. A couple of years later we had all gone
leashless alpine climbing. I remember Nils Nielsen showing me his prototype BD tethers in Alaska and I modified my old vipers and new Nomics to accommodate. I prodealed the BD umbilicals a couple years ago. I remember feeling liberated alpine climbing but especially soloing. Finally I didn't have to carry leashes for fear of dropping a tool.
For two seasons I soloed up to W15 with BD umbilicals, used them alpine climbing, and dismissed them totally when ice climbing. Then, roped up with my father on a WI3 I soloed weekly, I dropped a Nomic: bumped my knee cruising as quickly as possible and realized that in a lot of other situations, such as runout M5 or so, dropping a tool, even roped up, could spell disaster. I began to look into tethers with more scrutiny.
Black Diamond tethers seemed to have their advantages: light weight, swivels to help avoid tangles, and somewhat strength-rated.
After a trip to Patagonia I also realized that almost all non BD athletes were climbing on homemade, strength rated tethers. Hmmm…
The first time I saw a Black Diamond tether come unclipped was my buddy Ryan Stefiuk’s on the classic cannon climb *Omega.* It wasn’t good timing—warm temperatures, ice coming down on a heady lead—not when you want a gear malfunction. Since then I have witnessed several BD tethers come unclipped on people’s Black Diamond ice tools. SO: a product that comes unclipped, isn’t strength rated (if you fall onto your tethers, they’ll probably break), and is 50 dollars retail? The thought of those little carabiners snapping was nestling deeper and deeper into my subconscious.

Soloing Polar Circus with BD tethers. 3 or 4 years ago now?
There is a massive difference between the demands of hard climbing and the demands of the casual user. Most people with disposable incomes are the latter, and oftentimes climbers have to finagle their own solutions to problems. I made my own tethers using strength rated webbing and Metolius mini-biners. No gimmicks, such as swivels, (which some people buy at the hardwear store), to get in the way. Alpine gear should always be absolutely necessary or have a dual purpose: I can clip my homemades in as daisy chains for rappelling, leave the mini ‘biners and cut up the webbing for bail cord if I have to. Another advantage. I made mine a little longer than arm-length to accomadate for twisting around on pitches. A good idea.

Soloing the mixed finish to Fafnir with a homemade tether attached toa modified Nomic. Great mod, BTW.
This season I’ve climbed almost exclusively on my homemade tethers. I’ve noticed that the swivel doesn’t make enough of a difference for me to miss it. Let’s face it: gear and ropes can and will get tangled in both. Ideally this doesn’t happen and takes some getting used to. On 1-3 pitch ice climbs, sport mixed climbing, and the like, I don’t usually climb with tethers at all. Most of this climbing is done where a screw can be put in at any time, I can rappel, or the terrain is rocky enough that having tools is almost superfluous. Soloing, alpine climbing, and on mulitpitch mixed route, my tools are clipped in, strength-rated, all the time.

Probable 2nd or 3rd ascent of "fat of the land" in Newfoundland withtethers. Ripped off of Ryan Stefiuk's blog:)
http://bigfootmountainguides.com/.
Many friends here in New England putting up new routes always scoffed at my setup when I took them out on Cannon cliff or somewhere but I’ve noticed that more and more, tethers are being used by one time cynics on roped terrain.
The last time I used my BD tethers was on an attempt at the Girdle Traverse of Cannon Cliff. I figured the swivel might help with all the sideways climbing, but found no advantages once the rope got caught in between the swivels. That week, I sold them. Do yourselves a favor and don’t get caught up in marketing hype. Making your own pair or getting a simple, strong pair like the Blue Ice boa is the way to go. That extra margin of safety can make all the difference. Climbers should always be wary of too many moving parts anyhow."
Editor's Note:
I've written several times here about the issues with umbilicals and there use,
More here from previous content but a Google search of Cold Thistle will give you even more..
http://coldthistle.blogspot.com//01/ice-tool-umbilicals-repost.html

The simple umbilicals I use in the alpine
Beware here! Any umbilical set up you make is not going to be strong enough to take a fall on and not fail. None of the commercial ones will take a a full weight fall and nothing you will make with climbing webbing will either. You might geta tiny bt stronger than the commercial set ups but the margin for error here is slim to none! DO NOT RELY ON UMBILCALS TO SAVE YOU IN A FALL.
Read Black Diamond's warnings here and pay attention.
http://coldthistle.blogspot.com//04/bd-testswarning-on-umbilicals.html
Saturday, September 10, 2011
By request: chicken coop
Someone asked about the details of our chicken coop. I'm sure you can probably build one more cheaply than hubby did, but here you go. Click on any of the pictures for a larger version.
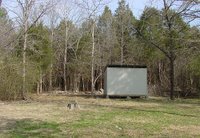
Open yard in front, woods in the back. The chickens used to roam picturesquely around the yard, but nowdays they're in the woods most of the time. If we fenced around the coop we'd have fewer predator losses I'm sure.

The ground is rocky and slopes a little here.
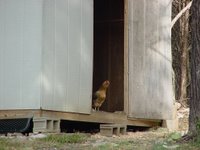
One of the Easter Eggers wonders what I'm up to. That cinderblock in front is really for me, but the chickens use it too. Hubby originally designed the back wall to have a door with a ramp for small chicks, but it turns out that they can hop up on the block too, so we never open the other side.
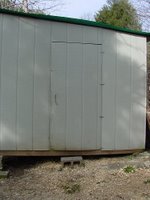
The door is person-sized rather than chicken-sized.
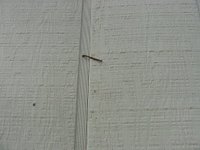
Fancy door lock #1 (closed door position). There's one at the top and another at the bottom.

Fancy door lock #2 (open door position).
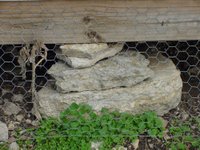
Fancy footing. Jasmine crawls under the coop at this end sometimes. Not that a little thunder would frighten her or anything... she just likes it under there.

Hubby poured concrete for the corner footings. He says that he wishes he'd made a row of footings down the middle (underneath) too but it's a little late for that now.
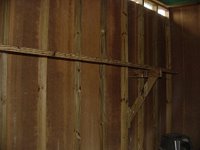
Left (front) side wall. We made two roosts on this side, one low and one high. They only ever use the high one though. Hubby went back and added some of these wall beams later because the side was bowing out a little. Whoever is the top-dog rooster usually roosts directly by the door on this side. No idea why! If you enlarge the picture, you can see that some of the chickens like to roost on that little support piece that's between the roost and the wall.
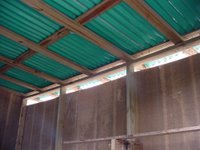
He's having the same problem with the back wall bowing, and says he needs to add beams here too. The roost is shorter on this side. When we had a lot more chickens, they'd divide up between sides. Nowdays they all roost on the same side, but usually divide up on either end!
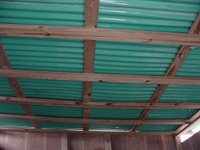
The roof slopes and has space for ventilation on both sides. I thought we might have trouble with critters getting in, but we've only had a problem once with a rat snake that ate several eggs and killed a pullet. The ventilation really helps in the summer and doesn't seem to hurt in the winter. (We are in zone 7 so this might not work in colder areas.)
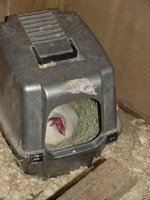
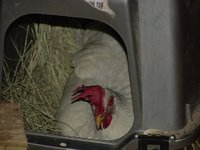
Here is the chickens' favorite nesting box. Yep it's a cat litter box. You can see a little piece of the never-used lower roost. I really need to remove it, since it's only good for banging up my shins.
White leghorn tries to give me the evil eye. She is the oldest chicken we have left now -- in the spring she will be three years old. She still lays very consistently, although her eggs are smaller than they once were.
All the chickens have begun laying again. I wanted to get more chicks in the spring, but hubby is trying to talk me out of it. We have been eating fewer eggs, but I really like having chickens just for pets. And I'm afraid that if we begin the spring with only 6 hens, we'll have none left by fall. There's still time to think about it.
Open yard in front, woods in the back. The chickens used to roam picturesquely around the yard, but nowdays they're in the woods most of the time. If we fenced around the coop we'd have fewer predator losses I'm sure.
The ground is rocky and slopes a little here.
One of the Easter Eggers wonders what I'm up to. That cinderblock in front is really for me, but the chickens use it too. Hubby originally designed the back wall to have a door with a ramp for small chicks, but it turns out that they can hop up on the block too, so we never open the other side.
The door is person-sized rather than chicken-sized.
Fancy door lock #1 (closed door position). There's one at the top and another at the bottom.
Fancy door lock #2 (open door position).
Fancy footing. Jasmine crawls under the coop at this end sometimes. Not that a little thunder would frighten her or anything... she just likes it under there.
Hubby poured concrete for the corner footings. He says that he wishes he'd made a row of footings down the middle (underneath) too but it's a little late for that now.
Left (front) side wall. We made two roosts on this side, one low and one high. They only ever use the high one though. Hubby went back and added some of these wall beams later because the side was bowing out a little. Whoever is the top-dog rooster usually roosts directly by the door on this side. No idea why! If you enlarge the picture, you can see that some of the chickens like to roost on that little support piece that's between the roost and the wall.
He's having the same problem with the back wall bowing, and says he needs to add beams here too. The roost is shorter on this side. When we had a lot more chickens, they'd divide up between sides. Nowdays they all roost on the same side, but usually divide up on either end!
The roof slopes and has space for ventilation on both sides. I thought we might have trouble with critters getting in, but we've only had a problem once with a rat snake that ate several eggs and killed a pullet. The ventilation really helps in the summer and doesn't seem to hurt in the winter. (We are in zone 7 so this might not work in colder areas.)
Here is the chickens' favorite nesting box. Yep it's a cat litter box. You can see a little piece of the never-used lower roost. I really need to remove it, since it's only good for banging up my shins.
White leghorn tries to give me the evil eye. She is the oldest chicken we have left now -- in the spring she will be three years old. She still lays very consistently, although her eggs are smaller than they once were.
All the chickens have begun laying again. I wanted to get more chicks in the spring, but hubby is trying to talk me out of it. We have been eating fewer eggs, but I really like having chickens just for pets. And I'm afraid that if we begin the spring with only 6 hens, we'll have none left by fall. There's still time to think about it.
Friday, September 9, 2011
Badlands :: The National Park
Tuesday, August 23rd - - After taking Babs to the airport in Sioux Falls (at 5 o'clock in the morning!) I returned to the motel thinking perhaps I could get in a few more hours of sleep. I rested for a while but sleep wouldn't come so I got up and back on the road, westward bound. Taking the Interstate, I made good time and arrived in Wall, South Dakota in mid-afternoon.
My “plan” was to visit Badlands National Park but the temperature had reached triple digits. Remembering what it had been like the last time, I got a motel room and hoped that it would be cooler in the morning! And, yes, I did pay a visit to Wall Drug, strolling through the various sections. It's an interesting place, to say the least.
Wednesday, August 24th - - As it turned out, it really wouldn't have been bad for camping last night after the sun went down. Overnight temperatures were in the upper 60s. Anyway, I got a relatively early start and was in the Badlands National Park by nine o'clock. Entering from the northwest, the route would take me south and east through the park.
Almost immediately upon entering the park I turned on the first drive off the main road, which was a gravel road but well maintained and in good condition with several overlook areas. The first one was Hay Butte Overlook.

An informative sign explained why it was called Hay Butte:

One of the flat-top buttes. I was amazed at how much “green” there was. Apparently there has been plenty of rain in western South Dakota this year!

Looking at the sides of the butte, it's no wonder that cattle and buffalo can't get to the top.

A little further down the road was the Badlands Wilderness area. It was rugged looking but seemed to have some areas that were more “rounded” and also had more grassland. There are even trees out there! I certainly wasn't expecting that.

My recollections of the Badlands from a visit in 1976 with my mother are far different than this. I recall a very dry, brown landscape. Rather forbidding and desolate. Yes, this is desolate looking, but it also has a strange beauty to it.
My “plan” was to visit Badlands National Park but the temperature had reached triple digits. Remembering what it had been like the last time, I got a motel room and hoped that it would be cooler in the morning! And, yes, I did pay a visit to Wall Drug, strolling through the various sections. It's an interesting place, to say the least.
Wednesday, August 24th - - As it turned out, it really wouldn't have been bad for camping last night after the sun went down. Overnight temperatures were in the upper 60s. Anyway, I got a relatively early start and was in the Badlands National Park by nine o'clock. Entering from the northwest, the route would take me south and east through the park.
Almost immediately upon entering the park I turned on the first drive off the main road, which was a gravel road but well maintained and in good condition with several overlook areas. The first one was Hay Butte Overlook.
An informative sign explained why it was called Hay Butte:
Erosion left a few high islands topped with virgin sod, the slopes so steep that homesteaders could not get their stock up to graze. Instead, the homesteaders waited until the grass was ready to cut.
Then several got together, took apart a mower, and reassembled it on the top of the table. Once the grass was cut and baled, homesteaders hitched it to a cable stretched from the rim to the lower prairie – and whoosh, the bales slid down. Hence the name Hay Butte for the long table on the horizon.
Today the high grassy tables are harvested only by bighorns and deer. The bison which roam the Sage Creek Wilderness are excluded as effectively as were the stock of the homesteaders.
One of the flat-top buttes. I was amazed at how much “green” there was. Apparently there has been plenty of rain in western South Dakota this year!
Looking at the sides of the butte, it's no wonder that cattle and buffalo can't get to the top.
A little further down the road was the Badlands Wilderness area. It was rugged looking but seemed to have some areas that were more “rounded” and also had more grassland. There are even trees out there! I certainly wasn't expecting that.
My recollections of the Badlands from a visit in 1976 with my mother are far different than this. I recall a very dry, brown landscape. Rather forbidding and desolate. Yes, this is desolate looking, but it also has a strange beauty to it.
Storing It for You
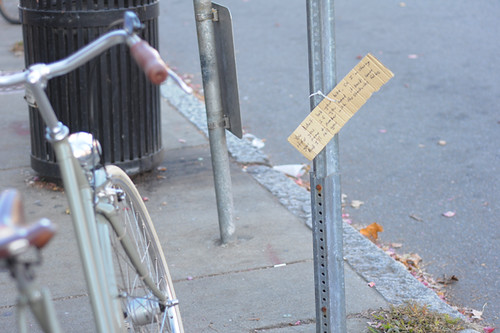 Sometimes readers find it hard to believe when I describe being approached by random people who will comment about my bikes or cycling technique - especially to express concern or give advice. I wonder what you'll make of this note I found zip tied to a pole outside of a Starbucksthis morning.
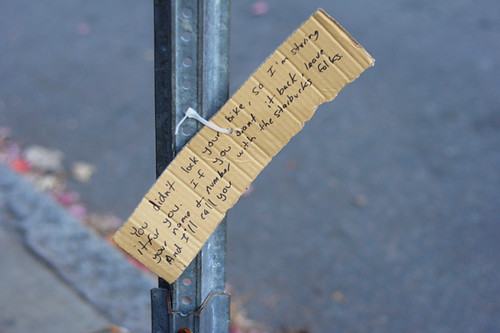
You didn't lock your bike, so I'm storing it for you. If you want it back, leave your name & number with the Starbucks folks and I'l call youI am thinking it reads kind of like a ransom note. Can't quite decide whether this is a good deed, or someone not minding their own business. I mean, what if the cyclist left it unlocked intentionally - hoping to get it stolen and buy a shiny new bike with the insurance payoff? I suppose the note could also be an innovative way to get a love interest's number. Or a secret communication channel for spies.Nothing to do with me or my bikes, but an example of what's within the realm of possibilities here in Boston.
Thursday, September 8, 2011
Sauce and we aint talking Pizza!

Should be obvious that I never tire of looking at me ;-) Really I need a better set of models or some friends because this is getting embarrassinglyold.I'm trying to get these three locals to model for me but haven't heard back yet.May be it was the low pay or the obviously stolen photo? I'll have to ask again.
 Fred, Saucy?
I am still trying to get organized and stuff put away and seeing what is missing from either being lost,stolen or just not deliveredyet fromthis trip.
Couple of Buffs are gone, a bunch of climbing gear, some clothing and one favorite hat. But thankfully not my Sauce! Bought this thing inBozeman @ Northern Lights during the'11 Ice fest. $30...not cheap but I liked the colors and the detailing. No clue who the company was or where they were until a hour or so ago.
By the numbers:
Chill Toque, $30.00
The Chill Toque is a fleece lined hat. Designed for warmth in cold weather, this is the warmest piece in the Sauce collection.
•Perfect for casual winter wear and low intensity winter activity
•The swirl closure, unique to Sauce Headwear, provides an escape for excess heat.
•The fleece lined headband, and double layer Meryl® upper will wick moisture and provide resistance to wind.
The Chill Toque is available in two sizes.
•Small/Medium for women with average or small heads and youth.
•Medium/Large for men or women who prefer a looser fit.
http://www.sauceheadwear.com/main.php
I have climbed some init and skied a bunch in it.

Awesome colors, nice size, thicknessand warmth. Only down side is the black took a beating in the sun's UVover the last few months, Dec thru March. But I liked the hat enough (and more than one person wanted it) that I went looking for another. Hard to find in the right color and size this time of yearso I went to the source of Sauce, Shayla. Got what I needed. Another loud and brightly colored print that won't fade in the sun is on the way.
Shayla is one of the poor Canadian immigrants trying to make her way in the cold commercial American outdoor industry. She is one of us...a skier. Cool hats.Worth the coin and if you can keep your light fingered friends away from them shouldlast a long time. Couple of models available and they make freak'in head bands as well! Everyone needs a new hat!
Hard to believe but I am just writing about gear I really liked and used a lot this winter. The Sauce "Chill Toque" (Canadian for hat, knucklehead) was one of the few.
And yes, the new Ergos are sweet!
Wednesday, September 7, 2011
Fully Summer

Optimal route condition and great weather systems are starting to line up with one another. Longer trail approaches on the West Side of the mountain are melting out which facilitates access to some rarely climbed gems. The freezing level has been hovering between 12,000 feet to 14,000 feet making for comfortable climbs. Mid-July has historically been the busiest time up high on the mountain - and for good reason.
Crevasses are starting to open wider, and as the summer wears on, the routes that navigate along glaciers become more circuitous. Longer summit climbs aren't necessarily the worst thing, but they can put climbers crossing bridges and overhangs during the warmest part of the day.
Notable events in the last week include a posse of "mono-skiers" on the Muir Snowfield, the opening of the new Carbon River Ranger Station in the often overlooked northwestern part of the park, and black bears starting to make their way into the alpine meadows. Come on up and enjoy prime-time at the park!
Tuesday, September 6, 2011
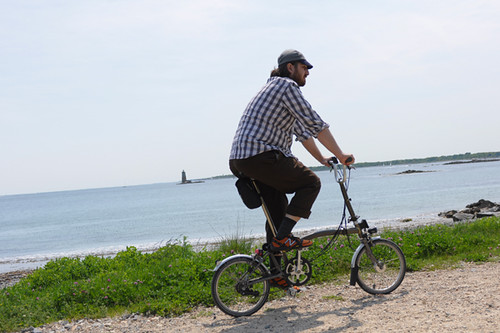
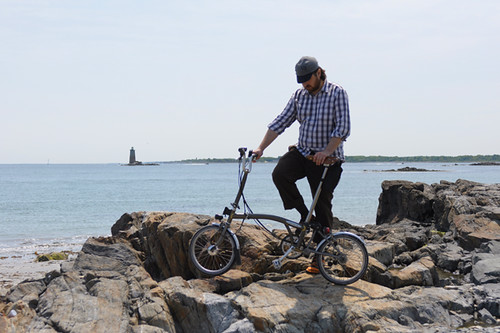
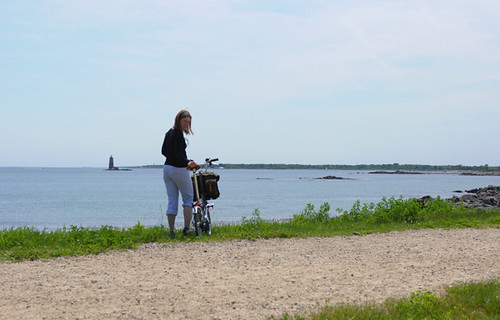
The Brompton: an Owner's Impression
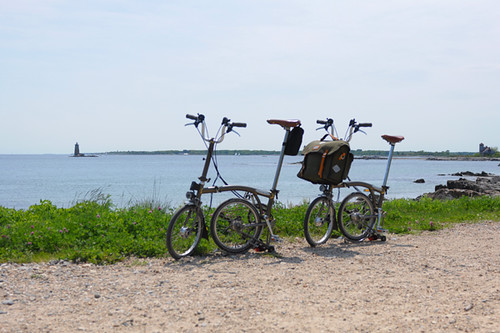
A few months ago we became owners of Brompton folding bikes. I am still surprised and a little embarrassed by how much I like my bike. Why that mix of emotions? Well, because I cannot really take credit for this purchase or for the specs - it was mostly the husband's idea! Don't get me wrong: I've been admiring the Brompton for years and have written about it here wistfully. I've even taken one on an extended test ride last summer. In the end I was not convinced that I actually needed or wanted to own a Brompton. But my husband was, and he argued that it made sense for us to both get them at the same time. Since he felt strongly about it I ultimately agreed, though remained nervous that my use of the bike might not justify the purchase. I now ride the Brompton nearly every day. Funny that something I was not sure I needed can now feel indispensable.
Designed by engineer Andrew Ritchie, the Brompton is a British folding bicycle that has been in continuous production since1987 and has remained largely unchanged since. You can read about the history here. There are many folding bikes on the market these days, but the Brompton is said to offer the most compact and easiest fold, with the durability and speed of a full-sized bike. The Brompton has 16" wheels and a hinged "unitube" frame. The construction is brazed steel, with the option of titanium extremities (fork and rear triangle) occasionally available via special order. The bike is optimised to carry a front load with low-trail geometry. The frames are hand-made in Brompton's factory near London. The wheels are built in Wolverhampton. Components are sourced from a variety of manufacturers including Sturmey Archer and SKS, 80% of the components being Brompton-specific in design. A selection of colours, handlebar setups, gearing options and accessories is available.
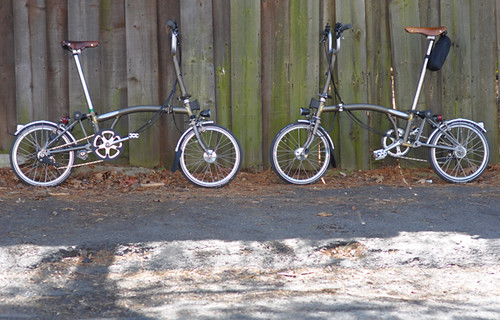
Our bikes ended up being identical except for the saddles and seatposts. The model is the Brompton M6L-X. This is code for the bikes having upright handlebars, fenders, 6 speeds, and titanium extremities. The finish is raw lacquer. The tires are Schwalbe Kojaks. The bikes are fitted with SON/ Lumotec IQ Cyo dynamo lighting. The Ti and SON specs were to save weight, improve ride quality, and have the best available lighting system. The raw lacquer we chose simply because we both love the look. Going with the 6-speed gearing option and choosing the lowered (-12%) gearing was a decision based on the advice of Todd from Clever Cycles in Oregon, who has toured on his own Brompton extensively. We did not want to make our bikes touring-specific, but we wanted the option of riding them in hilly areas.
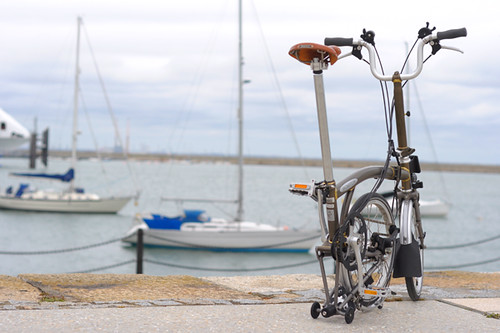
We chose the M-type model, because we both prefer upright handlebars when riding for transportation. Since handlebar height is mostly non-adjustable once you choose the model, the rider's positioning on the bike depends on saddle placement. I am just under 5'7" and with the M model my handlebars are almost 2" above saddle height. He is just over 6' and his handlebars are ever so slightly below saddle height, for a more aggressive position.
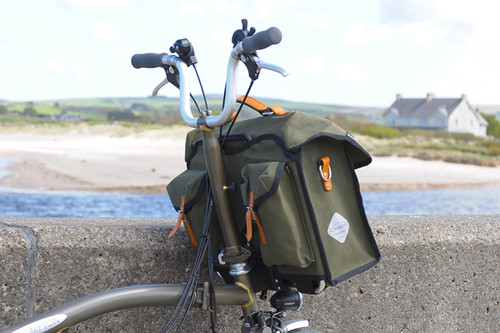
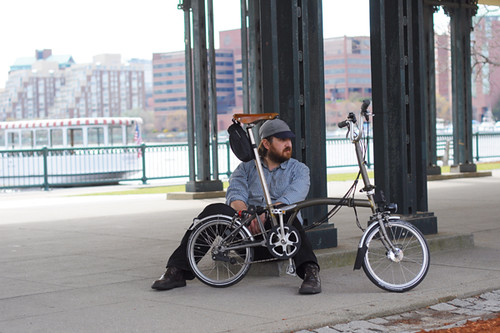
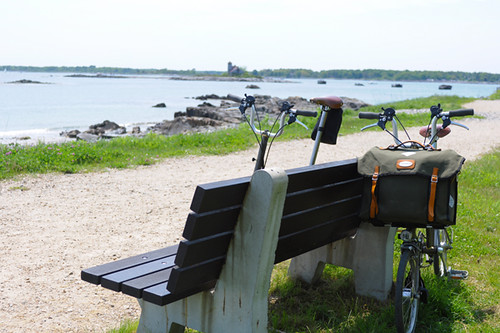
As far as accessories, we share a shopping basket and each have a Carradice City Folder front bag. The shopping basket is a big, open container with handles. The Carradice City Folder is a large office bag, with a padded laptop compartment, plenty of room for other things such as books, clothing and camera equipment, and two rider-facing pockets each large enough to fit a water bottle (or coffee cup!). I have lots more to say about this bag and will post a review soon. But no matter which Brompton bag one chooses, the system is easy to use. A front block must be installed on the bicycle's frame, and the bag or basket simply clicks onto it via an internal rack-like frame structure.The attachment system - consisting of the block, the "socket" that accepts the block, and the rack-like frame that extends from the socket - is rigid and solid. The bag does not budge once attached.We opted not to install rear racks, figuring the front bags - supplemented with saddlebags when necessary - would meet our needs. We can always add rear racks later if we feel it necessary.
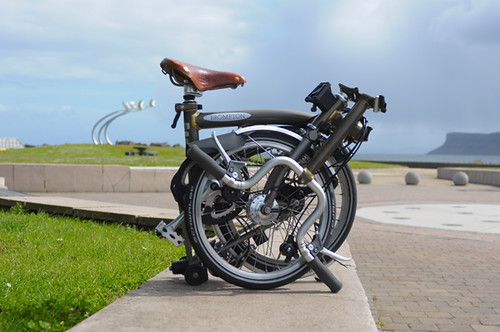
Not to overstate the obvious, but the Brompton is a very compact bicycle. It can be folded to different extents, including the "sit" fold that stabilises the bike as a kickstand would, the "shopping cart" fold that allows it to be rolled around by the handlebars (with basket attached, the bike turns into a shopping cart), and the complete fold shown here. After some practice, it takes me less than a minute to do the complete fold.The small fold makes itsuitable for travel like no other folding bike.
The compactness isn't just for travel and multi-modal commuting. The bike is light (compared to other city bikes) and easy to carry in and out of the house even in its unfolded state, which is especially practical for city dwellers who live up several flights of stairs and for those who wish to keep their bike in their office instead of parked outdoors for hours in an unsafe neighbourhood. I very rarely do multi-modal commuting unless I am traveling, but I still find the compactness useful for these reasons. Somehow, a small bike is an easy bike and I am enjoying this much more than I anticipated.
Of course, I am taking advantage of the fold as well. We have not owned a car for close to two years now, and it hasn't been simple to travel with two full sized bikes. The Bromptons will fit into any Zipcar without requiring bike racks or an oversized car, and they can go on any train, even at the most crowded of times.

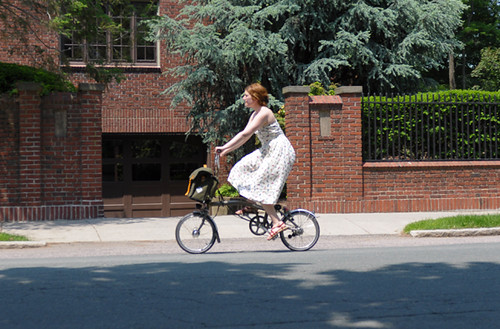
But what surprised me about the Brompton was not the compact fold, which I'd already known about. It was the features that distinguish it as a bike, not just as a folding bike. For instance, I had not fully understood previously how well it works for riding in everyday clothing. My positioning is upright. The frame's unitube is so low, the bike is essentially a step-through - no more difficult to mount/dismount than a loop frame. It has fenders and even tiny mudflaps. The wheels are so small and far down that even without dressguards my skirt doesn't go anywhere near the spokes. The crankset has a built-in chainguard, which is not an enclosed chaincase but good enough. The quick-release seat post is great for wearing shoes with different heel heights: Instead of setting my saddle for the flattest pair of shoes I own and then feeling as if my knees bend too much when I wear heels, I can simply adjust the saddle to whatever height I want for every ride.I can wear any outfit I want on this bike and not feel limited.
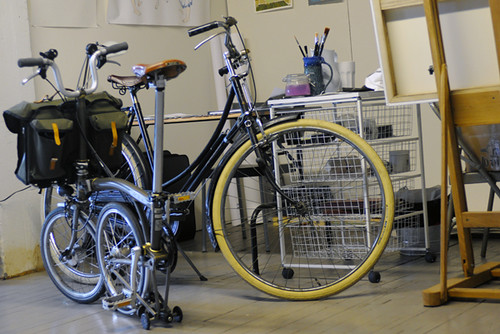
Then there is the cargo capacity. The Brompton can carry a surprising amount of stuff in the front, with no detectable impact on handling. I can carry all of my camera equipment - medium format clunkers, flash units, whatever - on the bike in a way that feels stable, safe and comfortable, not precarious or dis-balancing. Ditto with art supplies - heavy paint, primer, stacks of wooden panels. No problem. It just works and my balance on the bike is not affected. Essentially I now own a cargo bike that is sufficient for my needs.
When considering the Brompton, I worried about the handling and ride quality. I ride my bikes a lot. The kind of work I do, I don't just go to an office in the morning and back at night; I might ride from place to place all day and some of my destinations are 10+ miles apart. For that reason, a bike that is easy to transport but does not ride well is useless to me. When I test-rode the Brompton, its handling struck me as peculiar (the front end felt weirdly wobbly) and I was not sure whether I'd be able to get used to it. Even after a couple of days test riding it, I remained unsure. It took me about a week of owning the bike to truly get used to it, but once I did I started to prefer the handling over other bikes - especially in the city. The Brompton is easier for me to maneuver through tight spaces, easier to U-turn than other bikes, just somehow easier to handle all around. I no longer feel the "weird wobbly" sensation. When I later learned that Bromptons have low trail, it made sense.
It is a common complaint that small wheel bikes feel harsh. I was concerned about this, and together with the MTB-style hand position of the Brompton's handlebars, it just seemed like asking for trouble. I have nerve damage in my hands and am usually unable to ride in this hand position, especially if a bike's ride quality is harsh. I could just imagine my hands going numb after 10 miles (it has happened on other bikes after much shorter distances). However, I have experienced no problems with harshness or numbness on the Brompton, and do not know how to explain why not. I do not think it is attributable entirely to the Ti bits, but it could be the combination of that and the geometry. In any case, my longest single Brompton ride so far has been 45 miles (sandwiched between two 30-mile days) and I have yet to experience any discomfort so far.
As far as speed and the bike's ability to tackle hills, I would describe it as being more like a roadbike than a city bike. That does not mean it is quite as fast as a roadbike. But with the lowered wide range 6-speed gearing it can handle the same type of terrain. It takes me longer to climb on the Brompton, but I can do it, even with my decidedly upright position. Opting for a model with lower handlebars (the S-type) would have made it even more aggressive.
Finally, the Brompton has done better than I imagined it would off road. The handling feels intuitive on dirt and gravel, and the Schwalbe Kojak tires feel wider than the 32mm they are. The small size and the low step-over on the bike somehow makes me feel as if I'll be able to bail easier in the event of a "wipeout," which in turn makes me more confident. The most challenging off road ride I have done so far has been on the Brompton.
While my husband does not have as many miles on his bike as I do on mine, he has been commuting on it more or less daily, with his 3-year old Pashley Roadster now an inclement weather/ winter bike. Like me, he likes the Brompton's handling and ride quality more than he expected to, and the more he rides it the more he likes it. He is also very happy that he can easily keep the Brompton in his office and take it with him everywhere he goes. He hates leaving his bike locked up outside, and now he does not have to. The Brompton has little wheels that allow it to be rolled around in "grocery cart mode," but when grocery shopping he often just rolls the bike in unfolded, piles food into the basket, and checks out and rides off, without anyone objecting (not all stores permit this, but the one next to our house does).Like me, he is impressed by the front load system - its carry capacity, simplicity, lack of extra weight and bulk, and low to the ground positioning. He agrees that carrying weight on this bike has noeffect on steering or handling. He likes how the bike rides off-road. They've been resurfacing streets in our neighbourhood, leaving stretches of road without asphalt for days, and the Brompton rides nicely over the baselayer. He finds the bike maneuverable, easily able to make sharp turns and go around obstacles, hop curbs (I can't vouch for that one). In a general sense, what he likes is that performance-wise the Brompton does not feel to him like a compromise compared to a full sized bike. The one exception he is not crazy about, is the downhill handling - which he says is "more fun" on his full-sized bikes - though personally I do not feel that way.
One unexpected outcome of owning the Bromptons, is that we feel well-matched on them in terms of riding style. We are finding that it's easier to ride together on these bikes than either to go roadcycling or to ride our full-sizd city bikestogether. So after a break of many months we've started doing recreational rides together again. The Bromptons handle hills well enough for us to do the same routes as we would on roadbikes, only slower. Now we ride side by side and talk more than we ever used to. I am not sure what about these bikes is causing this harmony exactly, but possibly it's the handling.
As far as the Brompton's drawbacks, the main one for me is that there are times when I find carrying it around inconvenient. At over 20lb, it is not exactly a light bike for someone of my size to carry casually in one hand for prolonged periods of time, and it is not always practical to deploy the easy-wheels and roll it around (some shops and offices won't allow it). The good news is that after being forced to carry it frequently during my trip in Ireland, I now have more upper body strength and can deal with this better than I used to. Still, I do not see the Brompton being my sole transportation bike; I need a full-sized bike to supplement it for times when I prefer to leave my bike outside. Right now I ride the Brompton most of the time, supplementing it with my vintage Raleigh when I need a full-sized bike. I know there are debates as to whether it's okay to leave a Brompton locked up outdoors, and maybe some day I will feel comfortabledoing that. But at the moment I do not.
As far as quality, malfunctions, and things of that nature, it is probably too early to tell. Both of us had issues with seatposts slipping when we first got the bikes. In my case, simply tightening the clamp resolved this (the quick release is harder to use now, but still doable). The husband uses an anti-slip paste in addition to having tightened the clamp. During my stay in Ireland, my gears went out of adjustment and a couple of clamps rattled loose, possibly during one of my off-road rides. Chris Sharp of the VCC Northern Ireland (who owns a Brompton as well) was kind enough to re-tighten everything for me. He tells me this is not uncommon in his experience, and that he uses Loctite or similar on his own bike.
A less serious complaint pertains to how much of a spectacle riding the Brompton is. I am a fairly private person in real-life and these bikes garner a lot of attention. Crowds gather to watch me fold and unfold the bike. Children point and shout "Mommy, look!" as I ride by. Strangers approach to ask what the bike is, then ask to spell it and actually write the name down on a little notepad. It can get out of hand, and of course when the two of us are riding the bikes together it is even more of a sight.
Then there is the "clown bike" aspect of it. While I find the Brompton to be adorable, in a cartoony forest animal kind of way, I am pretty sure that I look ridiculous riding it. Unfortunately I have lost all sense of perspective at this stage. Worse, I really don't think I care.
So here I am, riding my lovely weird little folding bike and enjoying it very much so far. Other than using my own saddle, I have not made any modifications yet and am even using the stock foam grips without issue. At some point I will think of something to personalise my bike, but it is not a priority at the moment.
As a bike that's a mechanical curiosity, the Brompton invites elaborate technical analysis, but I've tried to steer away from that here. While I appreciate that aspect of the Brompton, it is only one of the things that attracts me to it. I like it not just for its multimodal commuting and easy-travel properties, but as a regular bike. That is what I most wanted to communicate at this stage.
Subscribe to:
Comments (Atom)